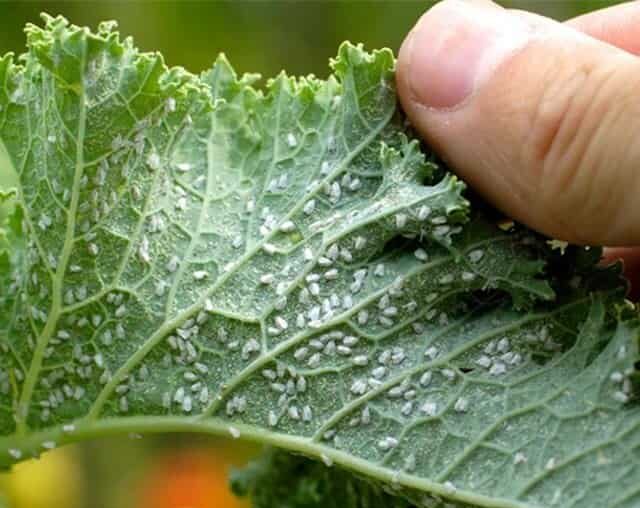
While gardeners may not be too put off by spiders, spider mites are another story. These tiny creatures are nearly impossible to discern by sight, and you’re instead left picking up the pieces after you notice symptoms of their presence.
This is why it’s so important to pick up on early signs of spider mites. In short, you want to look for small, discolored spots on the bottom of leaves as well as tiny holes in the leaves or buds.
This is easier said than done, and discovering spider mites can be an endeavor on its own. In this guide we explore what spider mites look like, how they affect plants in various stages of infestation, and how you can get rid of them and deter them from your plants.
About Spider Mites
Spider mites are part of the Tetranychidae family, which involves 1,200+ species. This is a subgenus of Acari, which includes all ticks, mites, and similar creatures.
Like you would guess, these pests look like tiny spiders. Furthermore, they wrap the plants they infest in a silky web, which is actually what inspired their name. Unfortunately, the web only shows up further into the infestation.
Spider mites only have 6 eggs when they’re born, but they gain 2 more as they mature. They have sharp mouths that leave tiny dots on the undersides of leaves, although you may need a magnifying glass to see them or the spider mite damage they leave behind.
There are hundreds of spider mite varieties across the globe, and they come in a variety of colors. While most are red, yellow, green, or brown, most of them change colors with the season to best blend in with the plants and leaves they call home.
Overall, they prefer hot, dry conditions, and they will travel until they find them. Luckily for them, they aren’t picky eaters, and they will feed on any plant leaves well-suited to infestation.
How Spider Mites Spread
Spider mites are extremely small, about 1 mm in size, and they travel just as easily as dirt or pollen. You’ve probably been passed by several in your life on a windy day, but you’re none the wiser due to their small size.
While being blown by the wind is a great way to travel vast distances, they don’t mind hitching a ride on unsuspecting hosts either. Cats and dogs are great at carrying them inside, but you can do the same if you don’t wash your gardening gloves or tools between handling your outside and inside plants.
Spider mites also aren’t above doing the legwork to get to a new plant if their host is no longer viable. They’ll move to the closest one when theirs is either dead or overpopulated, or if an adult knows they need space for their hatchlings to grow.
Early Signs of Spider Mites You Might Miss (<1 Week)
If you can catch spider mites in the first few days of their occupancy, you have a better chance of saving your plants and preventing the bugs from spreading to other plants in the area.
Early signs include:
- Tan, yellow, or white spots on the underside of the leaves
- Tiny holes in the leaves
- Visibly identifying the spider mites
The last one is unlikely given their small size, especially if you’re dealing with newly hatched insects, but you can give it a go by shaking the suspected leaf over a sheet of white printer paper. You may be able to see tiny dots as the bugs fall off.
Tan, Yellow, or White Spots on Leaves
The spots on leaves usually come before the tiny holes. As the tiny insects suck the sap out of leaves the plant will respond with the discoloration, signaling to you that something is wrong.
Unfortunately, these usually only show up on the bottom of the leaves, and you can easily miss them without a thorough inspection. Make checking the underside of leaves a part of your regular plant care routine, ideally every day or every other day to stop infestations before they go full force.
Holes in Leaves
Holes are the next side effect of the spider mites’ plan to suck the plant dry. They’re usually invisible to the naked eye until they reach 1 mm wide, but they often follow the discoloration we explained in the previous section.
You may see what you think is a large hole, only to realize it’s a cluster of tiny holes. While small, these holes are the downfall of a host plant, and it’s important that you stop the spider mites before they create any more.
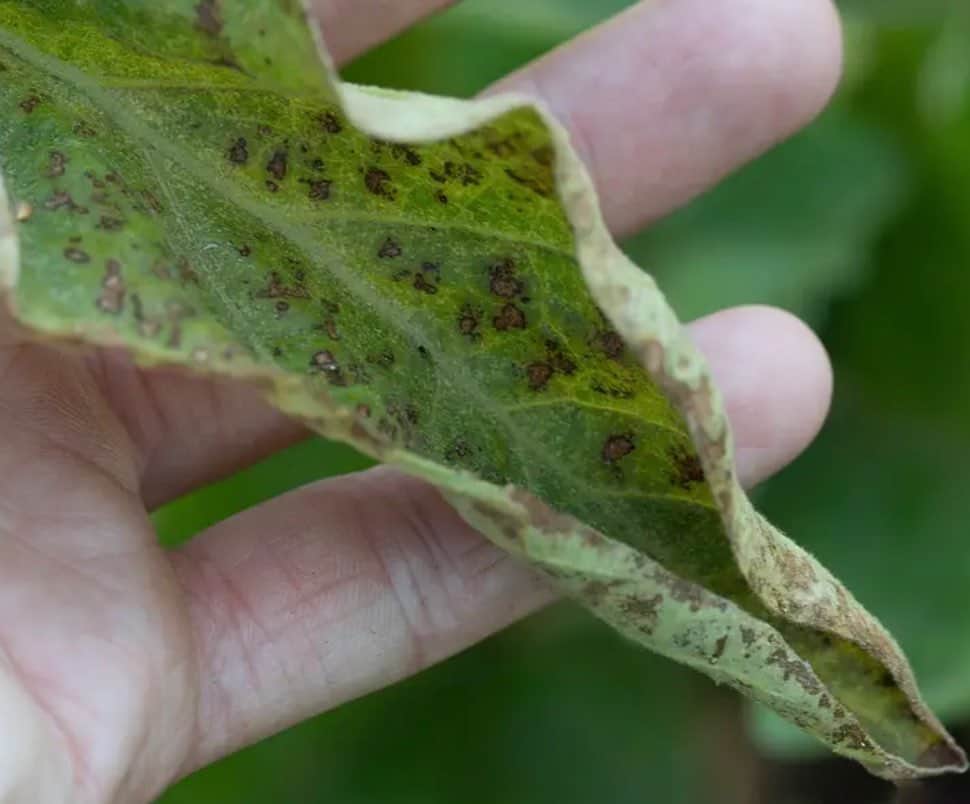
Later Signs of Spider Mites (>1 Week)
After they’ve established their population in your plant, you may start to notice:
- Yellowing of leaves
- Brown curled leaves
- Premature wilting
We’re not at the point of no return quite yet, but it’s unfortunate if they last this long. This type of damage often compromises whole parts of your plant and can set you back several months worth of growth.
It’s also easy to assume these are symptoms of a different issue. We urge you to double and triple check, even if you think spider mites are an impossibility, so you prevent ignoring the actual issue.
Yellowing of Leaves
The leaves of a plant will turn yellow as they start to die, although some of these leaves are dead already. They will not grow anymore, and it’s often best to remove them from the plant and dispose of them as if they have mites on them.
You can inspect the removed leaf for signs of spider mites more easily, but you should spray it in insecticides, horticultural oils, or soapy water to ensure they don’t spread to other plants.
Brown Curled Leaves
We may see brown curled leaves mean the plant needs water, but this isn’t always the case. If there are spider mites about, they’re simply drinking the sap and water of the plant, leaving nothing behind to keep the leaf hydrated.
Like the yellow leaves, you want to remove these, inspect them for spider mites or their bites, and then dispose of the leaf as if it’s infested.
Premature Wilting
Leaves that drop early or lose their turgidity may be struggling due to the spider mite infestation. This issue is also confused with drought, but it relates to the loss of sap and water in the leaves due to the parasitic spider mites.
You can remove these leaves as well, but it’s not as dire as the yellow or brown leaves. Premature wilting without a drastic change of color indicates that the plant still has some fight left.
Signs of a Spider Mite Infestation (2 Weeks+)
Spider mites aren’t worried about letting you know when they’ve completely moved in; they’re just too small for most of these signs to be immediately obvious.
You know you have a severe infestation if:
- The leaves or buds of the plants are wrapped in webbing
- You notice eggs or poor
- The leaves have a sandy texture
- Your ladybug population (or that of another predator) increases dramatically
Again, these aren’t a sign that you should give up on your plant. Instead, it’s even more dire to respond promptly and strategically to give it the best chance of survival possible.
The more severe the infestation, the more likely other plants in the area are also affected. Do a thorough assessment of your greenery, and consider treating everything at once just in case.
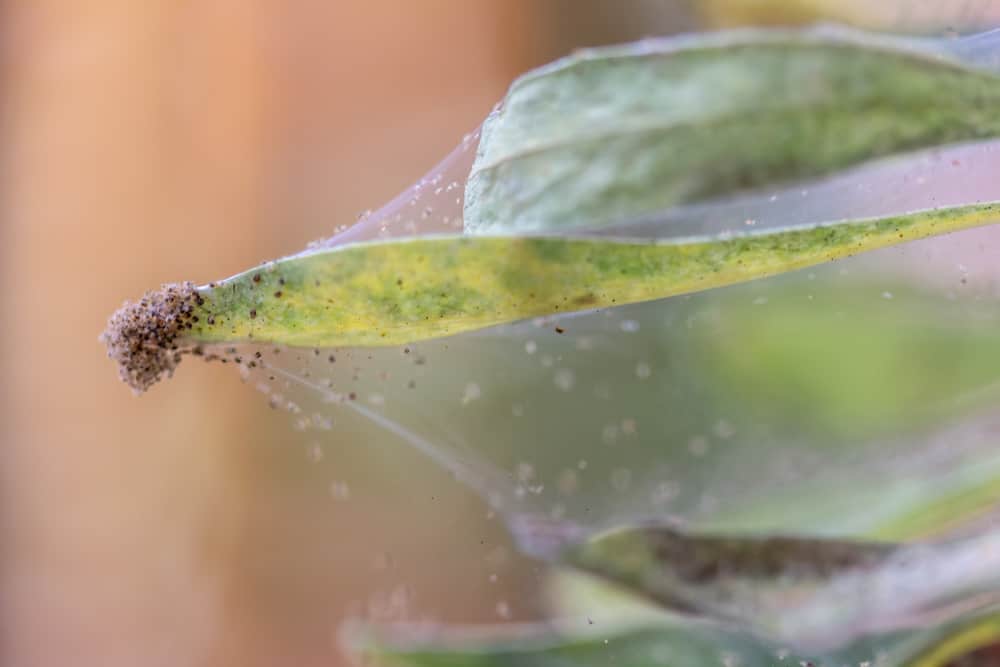
Leaves or Buds Covered in Webbing
Spider mites leave a silky web that completely encompasses the area they inhabit. This protects them from predators and dust while sending the leaf deeper into a spiral of despair as it no longer receives sunlight.
This only shows up after a severe infestation, and you will only see it on the leaves and buds of plants (not the stem).
These webs also show up as the spider mites use them to travel to new locations, but you’re unlikely to see them with the naked eye.
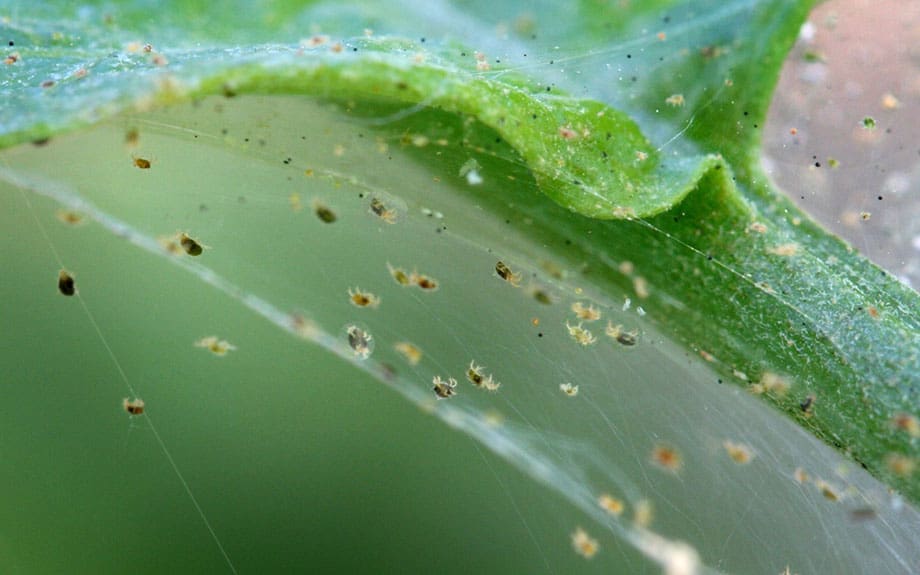
Spider Mite Eggs and/or Poop
If a spider mite has been around long enough to lay eggs and defecate on the leaf, it’s been there for a while.
Eggs are tiny and nearly clear, but a large clutch is easy to see (especially with a magnifying glass). The longer they sit, the more color they take on . Eggs that are off-white, cream, or tan colored are about to hatch.
The spider mite poop is usually black, but it’s not unusual for them to leave behind brown or white poop. While these colored spots can also be signs of decay, the mite poop sits on the leaf while the spots of death are actually tiny holes.
Sandy Texture on Leaves
The more mites, eggs, and poop on your plants, the rougher the texture on the leaves will be. You can rub the leaf between your thumb and index finger to see if you feel anything, even if you can’t see any signs beyond a dying plant.
Luckily, spider mites aren’t particularly aggressive, and they won’t bite you. You probably wouldn’t notice if they did anyway.
Ladybugs or Other Predators Move In
The more the mites gather in one area, the more predators they will attract.
Natural predators of mites and similar pests are ladybugs and aphids. If you’re suddenly swarmed with these creatures, there’s probably plenty of pretty for them.
Getting Rid of Spider Mites (and Prevent Another Infestation)
You don’t need to verify the presence of spider mites before moving forward with a plant-safe treatment. This means that even suspicion is enough to merit a response.
Our favorite tools for removal and prevention of spider mite infestation include:
- Simply spraying water
- Horticultural oils
- Deploying natural predators
These methods are also great at managing other pests, and they shouldn’t harm your plants even if you use them regularly. Still, make sure whatever you use is safe for your specific type of plant.
Water
When we say you need to spray the plant with water, we mean you need a hose or a shower; spray bottles won’t be strong enough to dislodge the spider mites.
Make sure you cover the areas underneath where the mites are most likely to gather.
If your plant isn’t strong enough to handle the pressure or it’s too large to move to a sprayable location, you can wipe down the leaves with a wet cloth. You may want to try something stronger, like a 1:1 water and isopropyl alcohol mix, to force them off.
Oils
Horticultural oils are particularly effective at removing pests, although they come from a variety of sources and may require more research to find one you’re comfortable using.
You can also use:
- Rosemary oil
- Neem oil
- Chamomile oil
- Spearmint oil
- Coriander oil
Most of these oils will smother them, dry them out, and even disrupt the reproductive functions and prevent new clutches from hatching.
You usually use the oil after applying insecticidal soap, but this is up to your discretion. Expect to apply oil every few days until the infestation is under control, and take care to keep the treated plants out of direct sunlight–the oil can scorch the leaves.
Natural Predators
Those ladybugs we mentioned in the previous section are actually something you can purchase and deploy on your own. Alternatively, you can purchase lacewings eggs (which will hatch and hunt down the pests) or miniscule predatory mites.
The latter may be the easiest to deploy in a controlled environment. They usually come in a granular carrier or a satchel, allowing you to sprinkle or hang them on the affected plant.
Conclusion
If you can pick up on the early signs of spider mites you give yourself the best chance at saving your plant and getting it on the road to recovery.
Remember to watch for:
- Colored spots or holes in the leaves (especially on the underside)
- Yellowing or browning of leaves
- Premature wilting
- Silky webs wrapping around the leaves or buds
- Increased predator presence
Are you worried about spider mites on your plants? Drop your questions or concerns in the comments, and we will do our best to help you keep your plants healthy and pest free.